Amit Kumar Sanu & Akash Sunil Raut
Get Introduced to Ansible
Last updated  July 17, 2021
Ansible is an open-source IT engine which automates the IT tools such as intra service orchestration, application deployment, cloud provisioning, etc.
Why We Use Ansible
Most Important reasons for using Ansible :
- Free to everyone
- Ansible is agentless
- Ansible is extremely steady and lightweight, and no requirements in regards to the working framework or basic equipment are available.
- It is extremely secure because of its agentless capacities and open SSH security highlights.
- Ansible does not require any special system administrator or technical skills to install and use it.
- Ansible has a smooth expectation to learn and adapt controlled by the exhaustive documentation and simple to learn design and setup.
- Its measured quality with respect to plugin, inventories, modules, and playbooks make Ansible amazing friends arrange enormous conditions.
Significant terms utilized in Ansible
Here are some significant terms which are utilized in Ansible, for example,
| Terms | Explanation |
| Ansible Server | It is a machine where Ansible is introduced and from which all errands and playbooks will be executed. |
| Modules | It is a cmd or set of similar cmds which is executed on the client-side.Ansible connected the nodes and applied the Ansible modules programs. Ansible executes the modules and removes them after completing. These modules can reside on any machine; no database or servers like things are required for this. We can work with any text editor or version control system or a terminal to keep track of the changes in the content. |
| Task | A task is defined as what action we want to perform or execute. |
| Role | It is a method of organizing tasks and related files to be subsequently called in a playbook. |
| Fact | Data gathered about the target node. |
| Inventory | A file which has the data related to the Ansible client-server or we can say that it is a list of nodes or hosts having their IP addresses, servers, databases, etc. which are required to be managed. |
| Play | Execution of the playbook. |
| Handler | It is like normal tasks in an ansible playbook used to indicate something but they run only when the Task contains a “notify” directive. It also indicates that it changed something. For example it is useful for secondary actions that might be required after running a Task. |
| Notifier | The section is attributed to a task which calls a handler if the output is changed. |
| Tag Hosts | It is used to specify the task or group by giving an identifying name. Hosts are the node systems which are automated by Ansible machines like RedHat, Linux, Windows, etc that can be whichever flavour you like. |
How Ansible Works?
Ansible works by establishing connections with your master & slave nodes and pushing out a little script program called “Ansible Modules” to them. Ansible then, at that point executes these modules on SSH by default and eliminates them when finished. Your library of modules can dwell on any machine, and there are no workers/servers, daemons, or databases required.
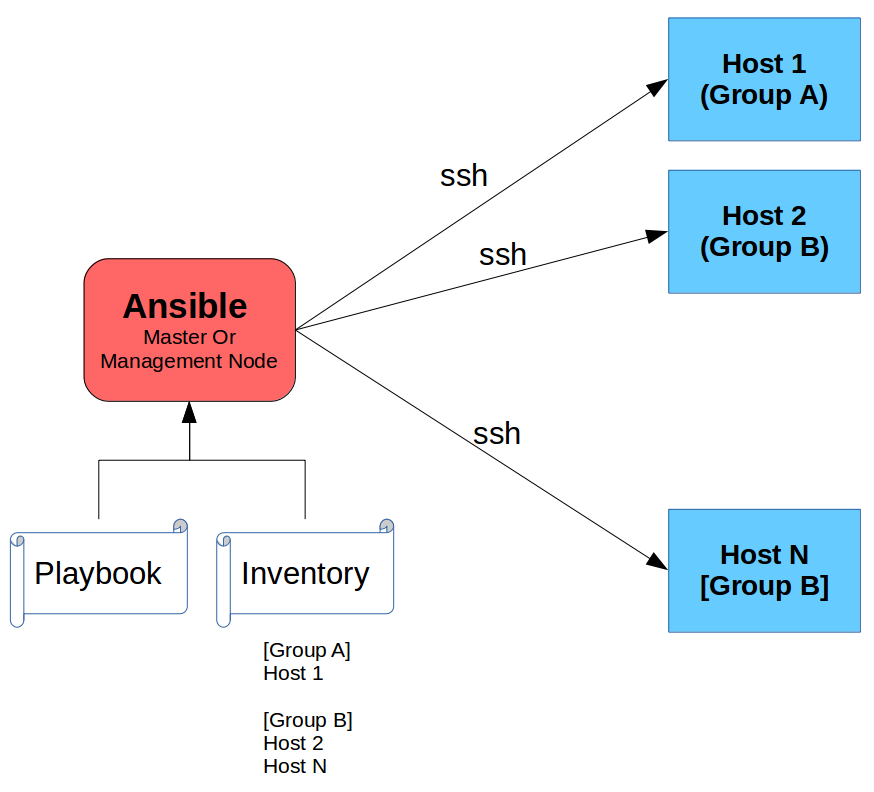
Please refer to the picture -> The management node in the picture is the controlling node. Basically it is the master node which controls the entire execution of the playbook whatever script is written in it. It is the node from which we are running the installation. The inventory file provides the list of hosts to which you have to connect where the Ansible modules need to be run and the management node establishes a SSH connection and executes the small modules on the hosts machine and installs the product or software whatever instructed in the script of the playbook task.
Magnificence of Ansible is that it eliminates the modules once those are installed so adequately it associates with the host machine , executes the instructions and if it’s effectively installed eliminates the code which was replicated on the host machine which was executed.
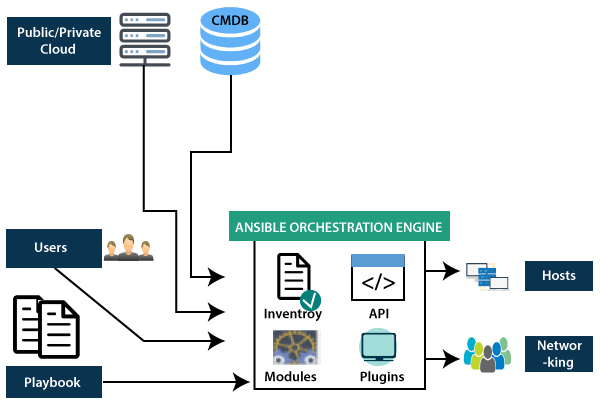
Ansible Architecture
The Ansible orchestration engine talks with a user who is scripting the Ansible playbook to implement the Ansible orchestration and interact with the services of private or public cloud and configuration management databases.
Installation Process
There are two types of machines when we go for deployment ?
- Control machine ? It is a Machine which controls and manages other machines.
- Remote machine ? It is a target machine which is controlled or managed by a control machine.
One control machine can control or manage multiple remote machines. As a result, we must install Ansible on the control machine in order to manage remote machines.
Prerequisites
- PyYAML: This is the YAML parser and emitter for the python language.
- Httplib2: A library which is comprehensive for HTTP clients.
- parmiko: SSHv2 protocol library for Python.
- Distro: RHEL/ CentOS/ Debian/ Ubuntu Linux.
- Jinja2: It is a python framework which helps us for templating.
- sshpass: a non-interactive ssh password authentication.
Point to keep in mind
Ansible can be used on any computer that has Python installed.
Note ? Windows does not support control machine
By default, Ansible uses ssh to manage remote machines.
Ansible does not add any database. It may be started and stopped without the use of any daemons. Ansible does not leave any software installed or running on remote devices while managing them. As a result, while upgrading to a new version, there is no need to worry about how to upgrade it.
Install Ansible on Centos/RedHat systems
Step 1) Install EPEL repo
$ sudo yum install epel-release
Step 2) Install ansible package
$ sudo yum install -y ansible
Install ansible on Ubuntu/Debian systems
Step 1) Perform an update to the packages
$ sudo apt-get update
Step 2) Install the software-properties-common package
$ sudo apt install software-properties-common
Step 3) Install ansible personal package archive
$ sudo apt-add-repository ppa:ansible/ansible
Step 4) Install ansible
$ sudo apt install ansible
Hands-on
Step 1 : Create at least two EC2 instances and launch one for control/master and another as remote/slave/node whatever you want to say. You can create n numbers of instances as node/slave

Step2 : Select one instance as master and check the prerequisite and here i am using Linux2 AMI instance.
$ sudo amazon-linux-extras install epel

Now in next step install the ansible
Step3 : $ sudo amazon-linux-extras install ansible2
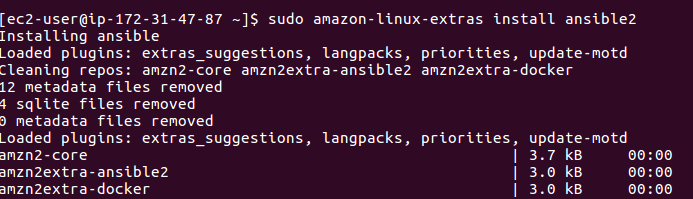
-> Check the version $ ansible –version All set open other remote servers aside and now we take the controls of slave servers on master with passwordless authentication

Passwordless Authentication
We generate the ssh key on master and we will copy this generated key and paste it in the slave server’s authorized key file.
Step 4 : Generate the key on master by running cmd
$ ssh-keygen
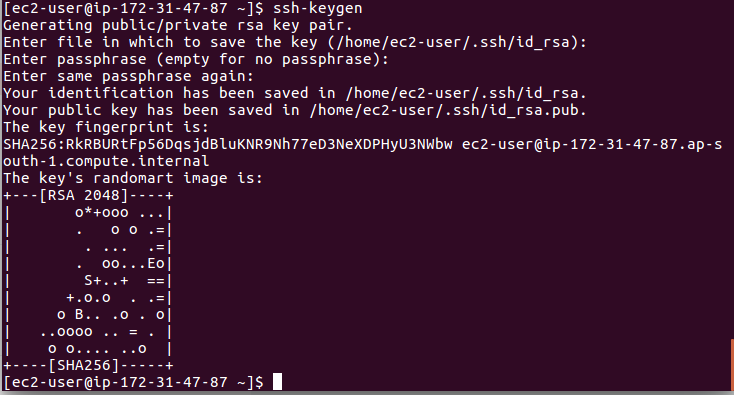
-> move to the master’s server .ssh directory , here you will find the id_rsa.pub file open it and get the generated key
$ cd .ssh
$ nano id_rsa.pub open the file and copy the key

-> now move to the slave/remote-host server and open the $ cd .ssh directory and paste the copied key of master in the slave server’s authorized_key file. Donjo
Open it by running cmd $ nano authorized_key paste and save CTRL + S

Step 5 : Now master have the control of slave for checking it run cmd
$ ssh <public_ip of slave server> on master
Here in my case $ssh ec2-user@ip-172-31-42-232 After hitting enter you will get the control of slave on master, the terminal interface of slave will be open inside the master terminal as implemented in the screenshot.
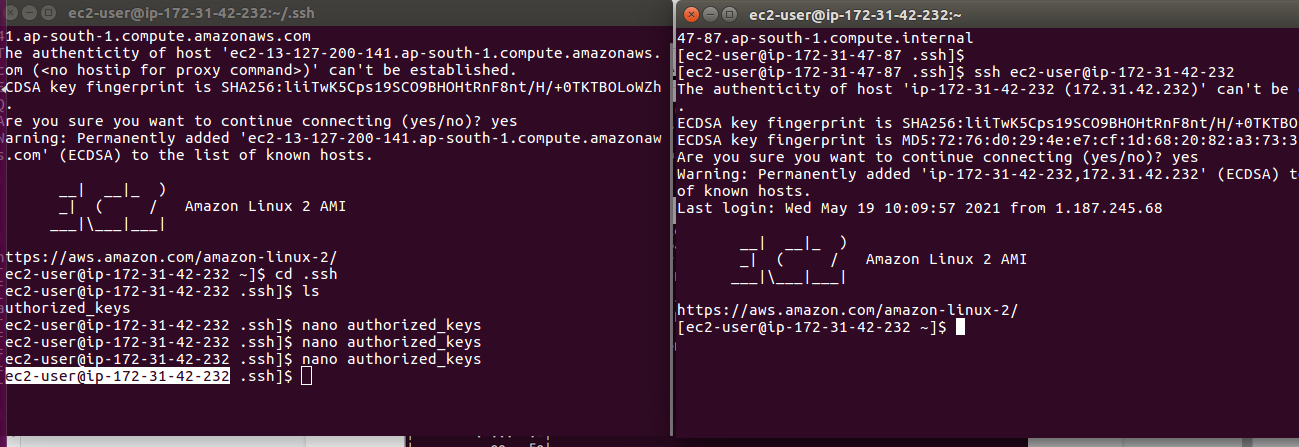
Here in screenshot left one is slave server and right one is master server which is having the access of the slave server, you can check next src that is easy to understand.

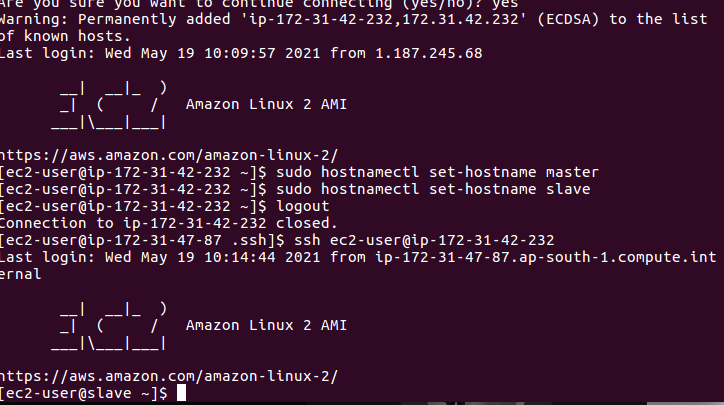
Step 6: We can change the hostname for readability just run cmd
$ sudo hostnamectl set-hostname slave
Inventory
You can use ansible to make changes in the number of machines using a list or group which is nothing but inventory.
Once you have defined the inventory you can use patterns to select the hosts and groups on which you want to perform actions. The default path for inventory is a file called /etc/ansible/hosts. you can also create your own inventory file and specify it in command using -i <inventory file>
But we will not disturb default inventory, we will create our own inventory.
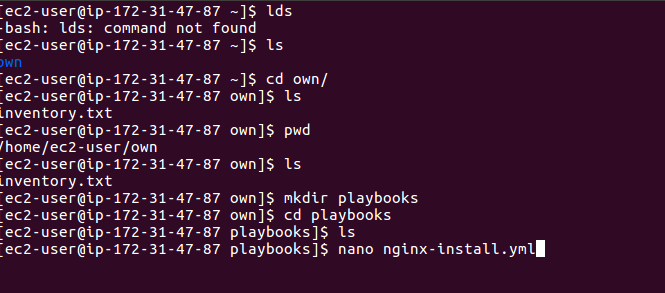
Step 7 : First create a directory here in my case i am creating OWN directory
And inside it create inventory.txt file and write info of the slave host server.

Inside we put the public ip of the servers which we want to have control and here we can make groups also.
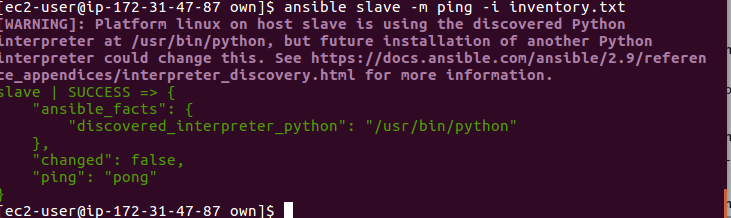
Let check our inventory is working or not by running the ad_hoc cmd that is our next topic
$ ansible slave -m ping -i inventory.txt
-> After doing all setup with inventory setup lets get aware with playbook and also how ansible works
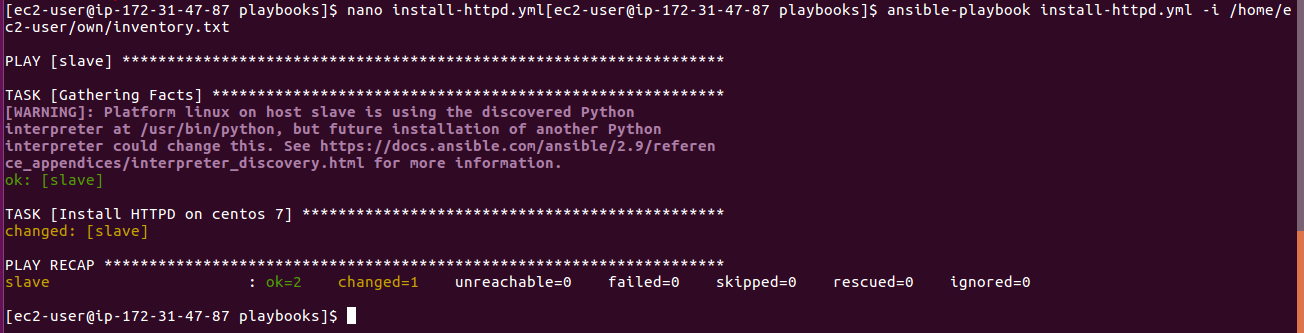
Step 8: Now we will implement the installation of nginx for that we write one playbook in the yml file before this lets nginx be installed on our slave server or not.
Run the cmd $ yum install list | grep nginx
Or
$ ps -ef | grep nginx
So we don’t have nginx on our slave server.

Step 9: Let write the playbook for nginx installation and save it

-> Now run playbook cmd
$ ansible-playbook var.yml -i /home/ec2-user/own/inventory.txt

-> it’s time to check whether our nginx is installed on our slave server not.

Note – Just go through the playbook screenshots which will to understand and imagine then we will start Ansible Playbook

Ansible Playbook
There are two ways to run ansible
- Imperative way
In Imperative way we use ansible commands to perform task
Syntax
ansible host_name -m module
Example:

Ad_hoc Command
Ad-hoc commands are declarative ways to run ansible tasks. to perform all actions it uses the “/usr/bin/ansible” binary. One disadvantage of ad_hoc is not reusable.
Ad-hoc commands are best for tasks we want to execute once. For example, if we want to check whether a given user is available or not, or anything which smallest one line task then we can use the Ansible Quick One liner cmd without writing a playbook
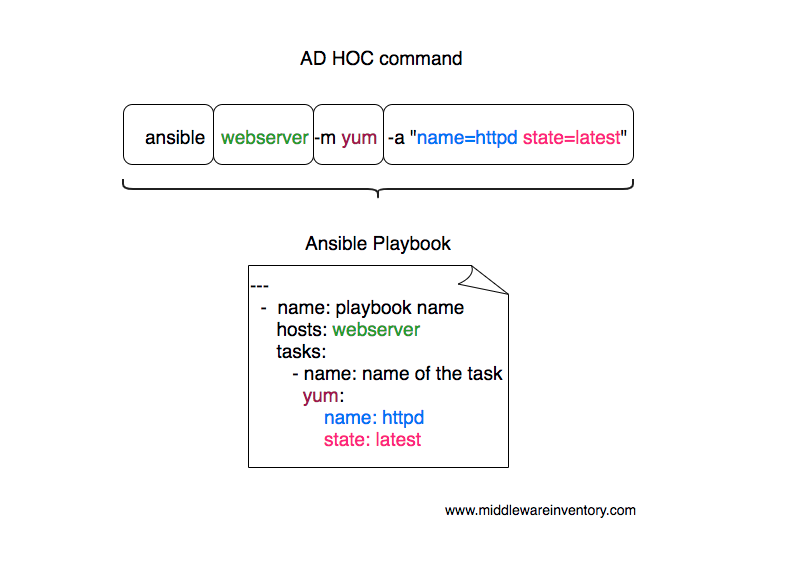
General Syntax of ad-hoc command:
ansible | [pattern] | -m [module] | -a “[module options]”
A | B | C | D
There are four parts of the ad-hoc command and the details are below.
+—————–+—————————————————————-+
| Details | Description |
+—————–+———————————————————————————+
|ansible | A command |
|pattern | Input the entire inventory or a specific group |
|module | Run the given module name |
|module options | Specify the module arguments |
+—————–+———————————————————————————+
Ansible Ad Hoc commands
Following are some important ad hoc commands
- ansible ad hoc command for ping
ansible node -m ping -i inventory.txt
- ansible ad hoc command for Transfering files
ansible node -m copy -a “src=home/ubuntu/file.txt dest=/home/file.txt” -i inventory.txt
- ansible ad hoc command to check the service status
ansible node -m service -a “name=httpd” -i inventory.txt
- Check if package is installed and update it
Ansible node -m yum -a “name=httpd state=latest”
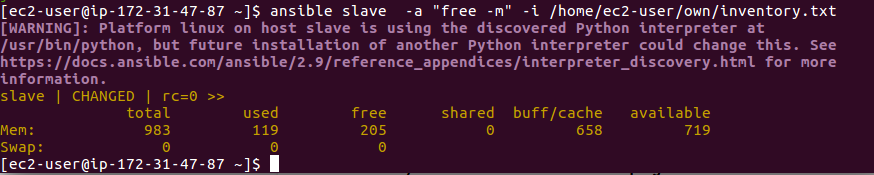
- How to check the free memory or memory usage of hosts using ansible adc_hoc cmd
ansible node -a “free -m” -i inventory.txt
- ad hoc command to Start the service
# To Start
ansible node1 -m service -a ‘name=httpd state=started’ -i inventory.txt
- ad hoc command to reboot the remote system
ansible all -m reboot -a reboot_timeout=3600 -i inventory.txt -b
- Check if package is s specific version
ansible node -m yum -a “name=httpd1.8 state=latest”
- Check if package is not installed
ansible node -m yum -a “name= httpd state= absent”
- run command with sudo
ansible -i hosts host1 -m shell -a “cat /etc/sudoers” –sudo
- Provide Privileges
ansible slave -m shell -a ‘fdisk -l’ -u amitsanu –become -K
- Declarative way
In declarative way we use playbooks to perform tasks
Syntax to run playbook
ansible-playbook playbookfile.yaml
ansible-playbook playbook_file.yaml -i inventory_file.txt
Example:

Some Ansible Playbook Examples
Example 1: Ansible Ping module
We use ping module to check connectivity between Ansible controller and host
If the connection is successful the result would reply with pong
Below is the playbook and result to check connectivity
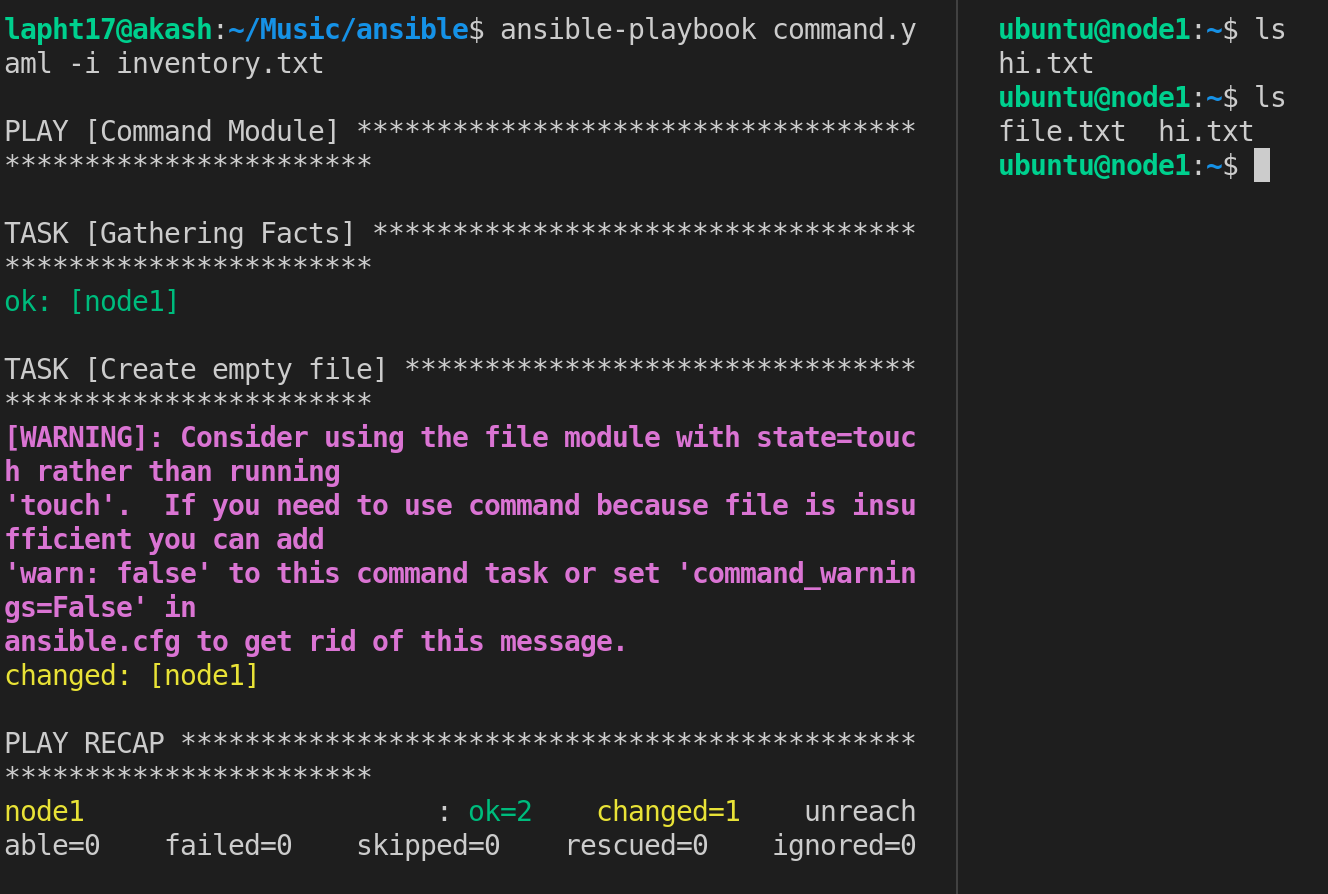
Example 2: Ansible Command module
Playbook for Command module
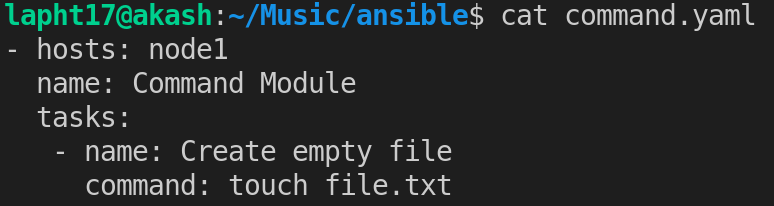
Command module: This module is used to execute command on host machine
You can execute any commands using this module
Result:
Example 3: Ansible Copy module
Playbook for Copy module

Copy module: This module is used to copy file/data from ansible controller to host machines
Core part is src and dest
Task :
Copy file from Ansible Controller to the host machine
Result:
To verify login to host and check file

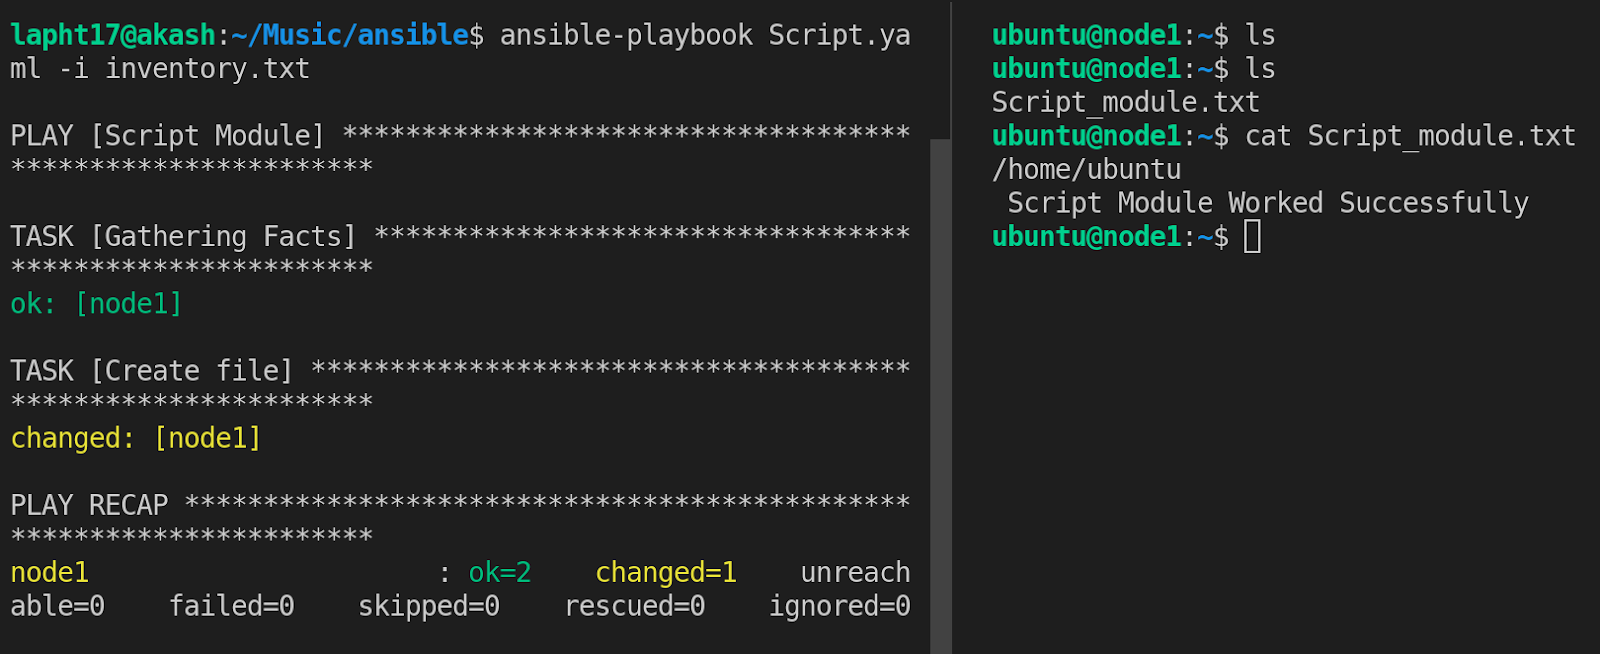
Example 4: Ansible Script module
Playbook for Script module
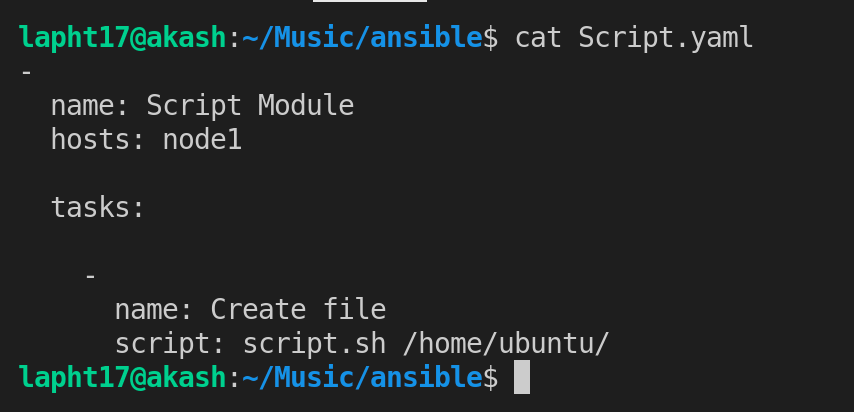
Script module: This module is used to run scripts on host machine
Task :
Create script file on ansible controller and use script module to run those script on host
Result:
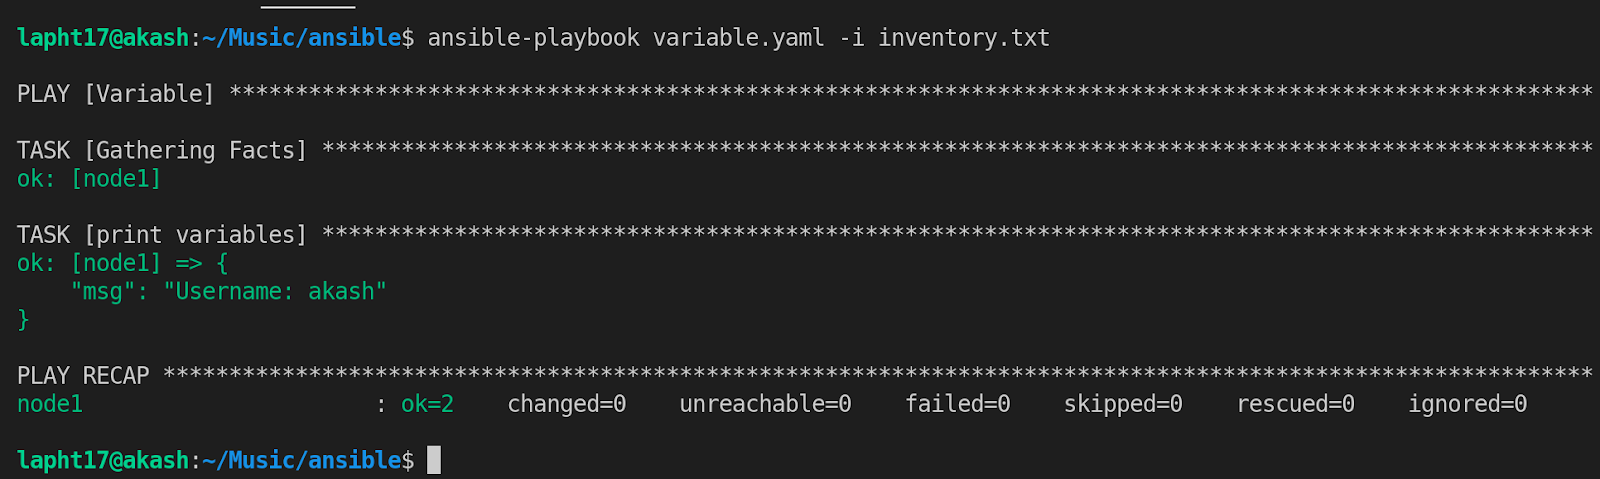
Example 5: Ansible Variable
Playbook for Variable

Variable: Like variables in programming language, ansible variables are used to store particular data
Result:
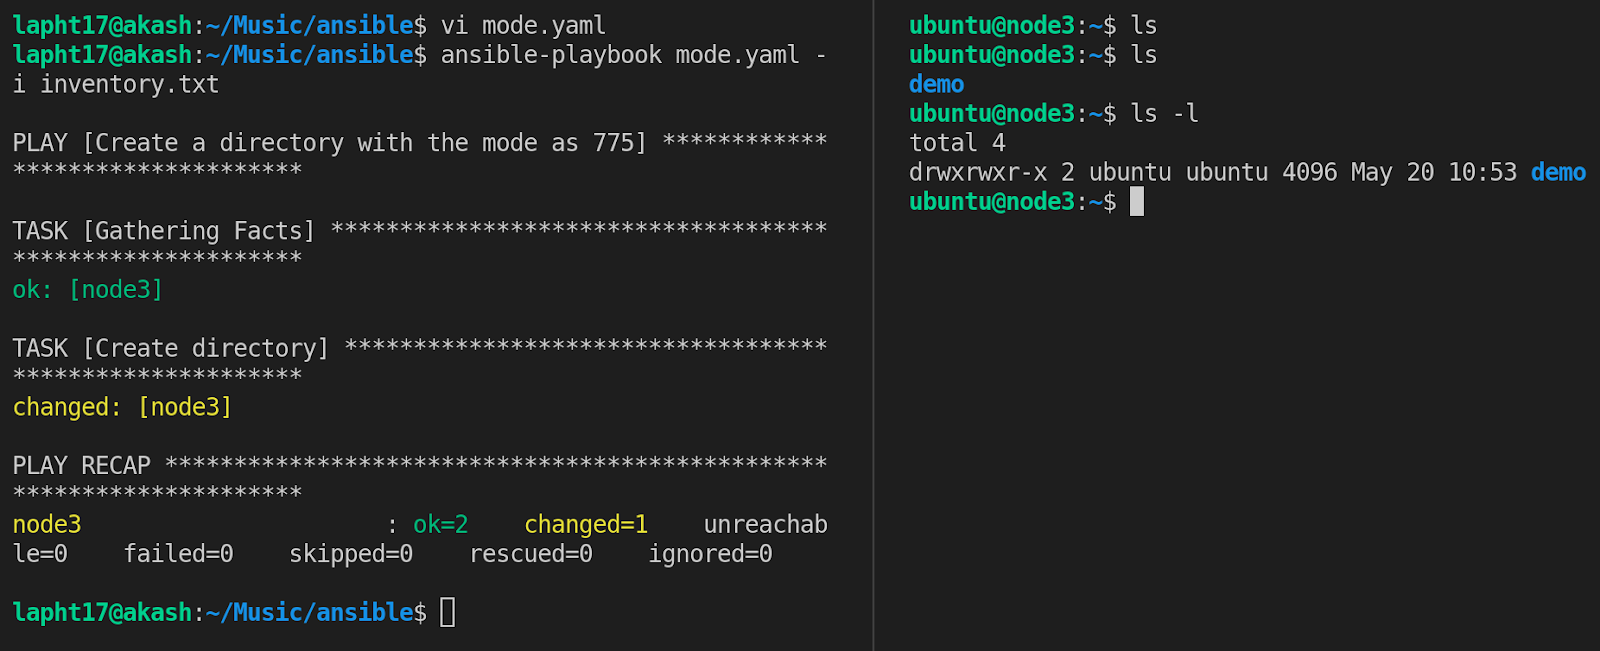
Example 6: Create a directory with the mode
Playbook for Variable
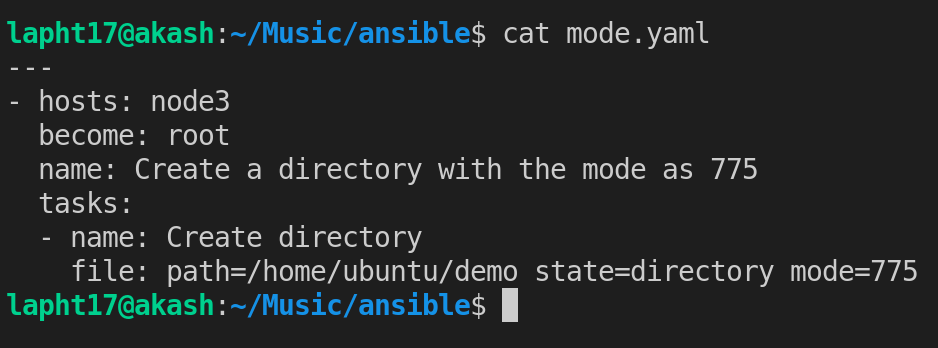
Task :
Create folder/ file and use mode to modify permissions of folder/file
Result
Example 7: Ansible Loop
We use loop when you want to perform repetitive task
You can use with_items statement to create multiple directories with one single task only
Playbook for loop

In this example we are creating loop to create multiple directories
Result

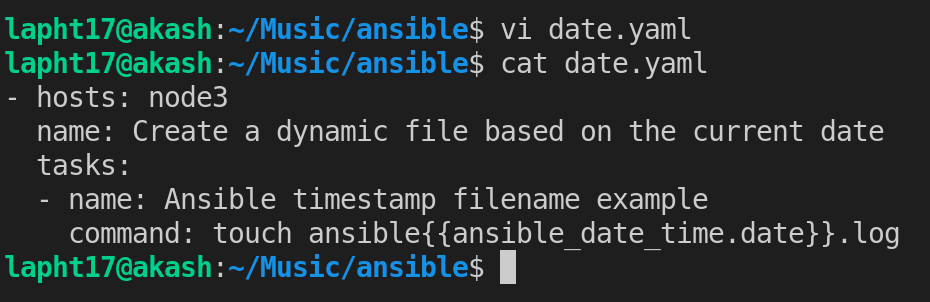
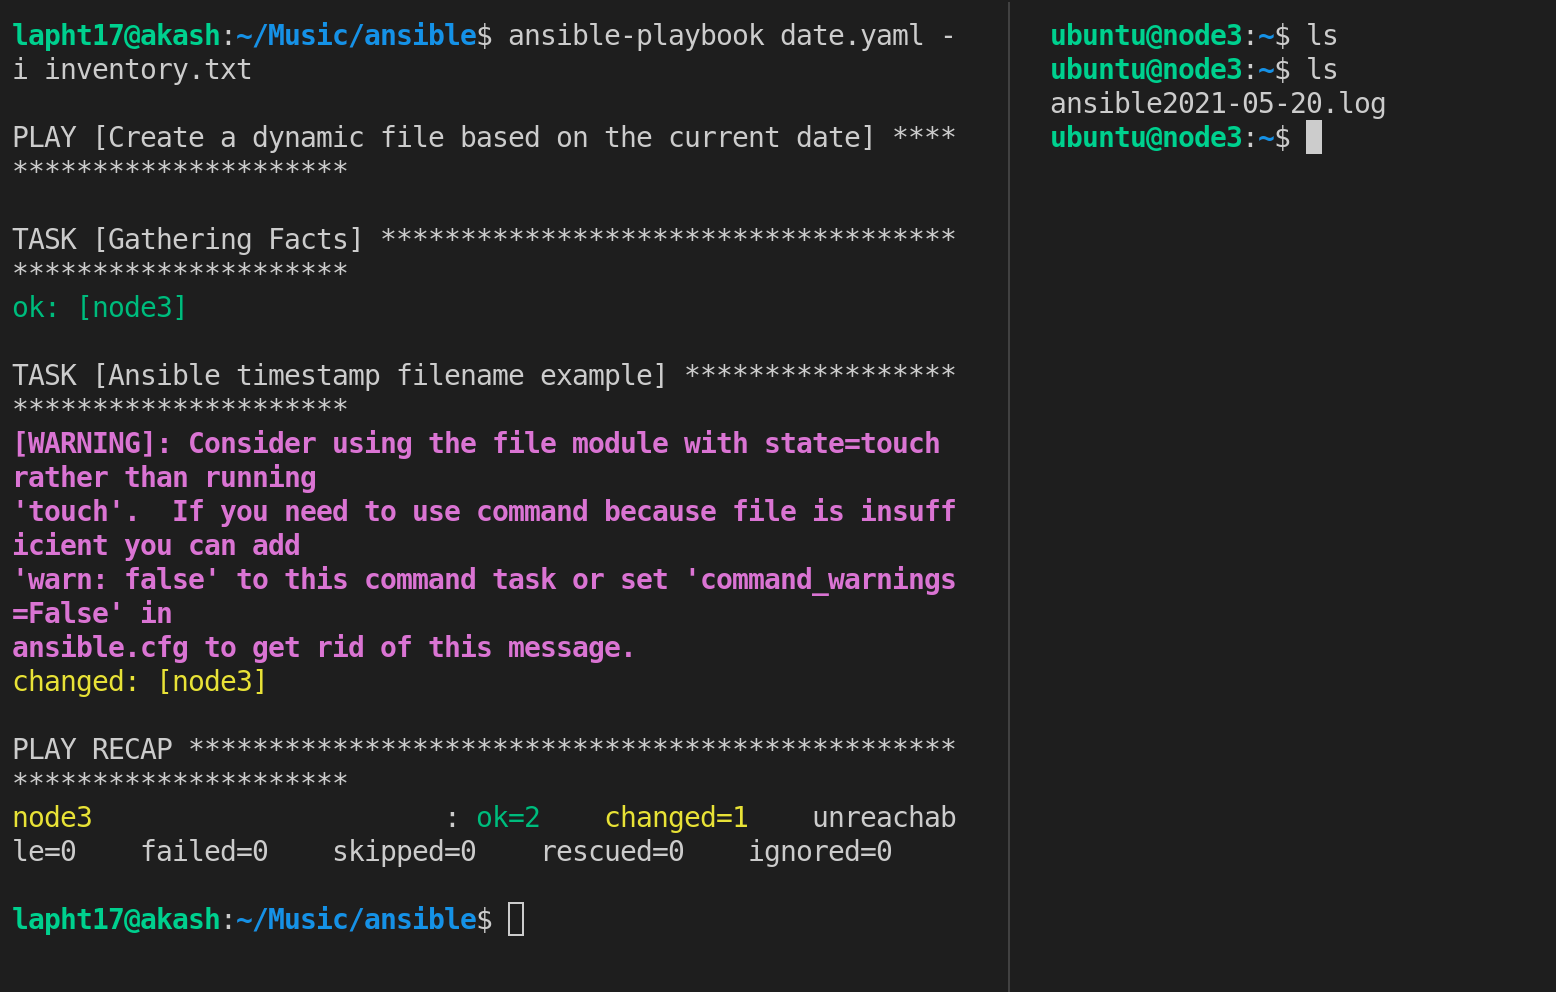
Example 8 : Create a dynamic file based on the current date
Playbook to create a dynamic file based on the current date
Result
Example 9 : Docker Installation using ansible
Playbook for docker installation
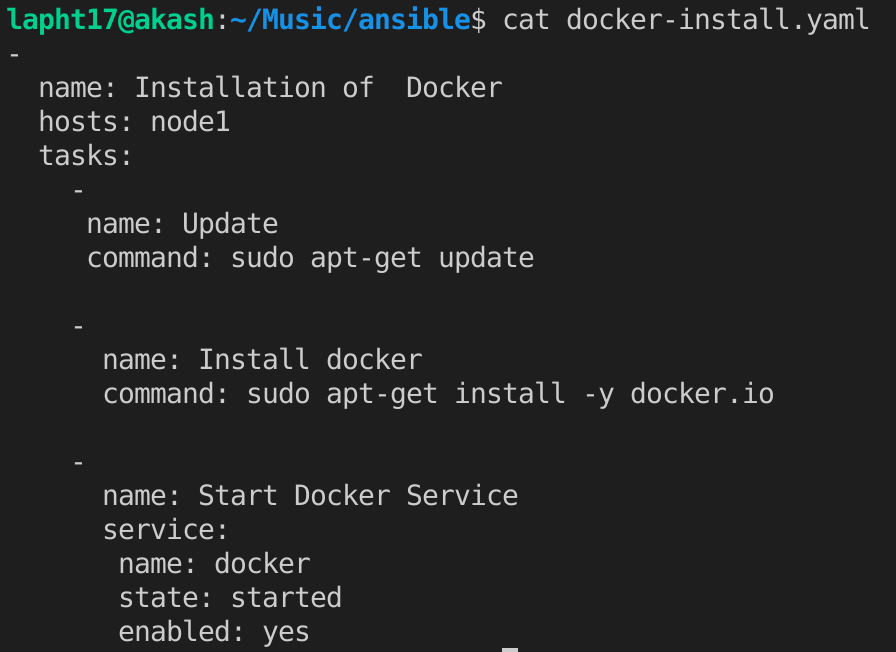
In above playbook we have used different types of modules to perform tasks
- Command module : This module is used to run command on host machine
- Service module : This module is used to start, stop and restart the service on host machine
Tasks Included in docker installation playbook
Task 1: Update Repository using command module
Task 2: Install docker using command module
Task 3: Start docker service using service module
Result:
When the playbook run successfully check the version of docker to verify installation on host machine


Example 10: nginx Installation using ansible
Playbook for nginx installation
In above playbook we have used different types of modules to perform tasks
- apt module : This module is used to install particular package/tool
- notify module : This module is used to notify the installation completion
- Service module: This module is used to start, stop and restart the service on host machine
Tasks Included in docker installation playbook
Task 1: Install nginx using apt module
Task 2: Start service service using service module
Result:
When the playbook run successfully check the version of nginx to verify installation on host machine

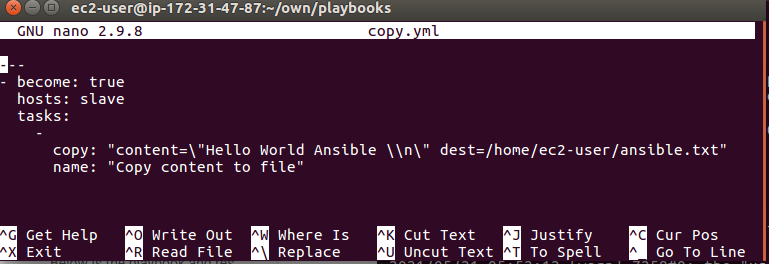
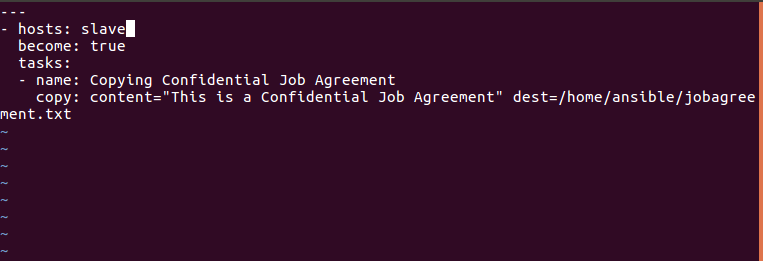
Example 11 : Copy content to a file using the copy module.
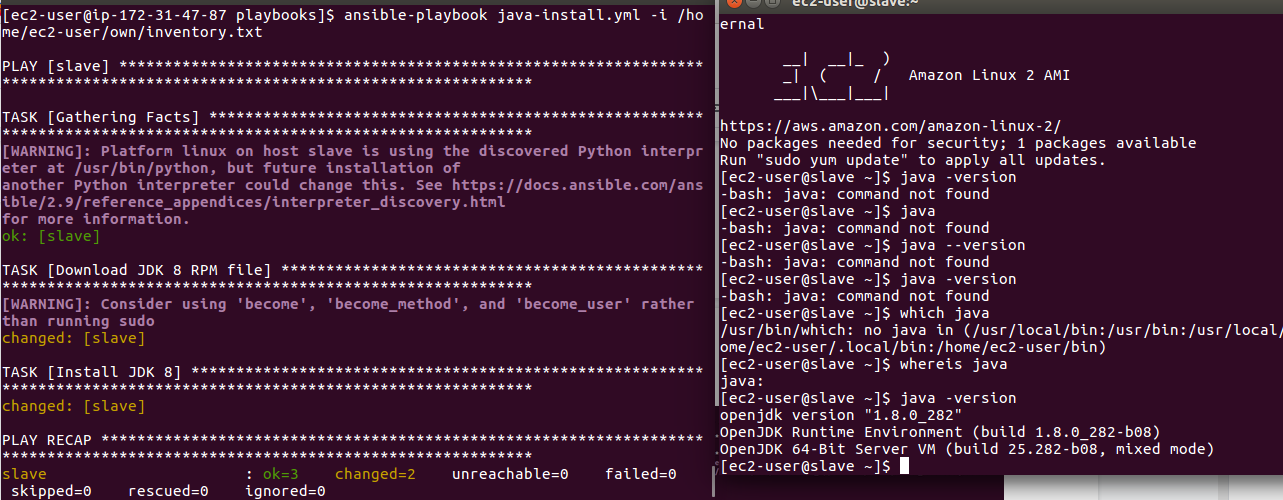
Example 12 : Java Installation
-> Result
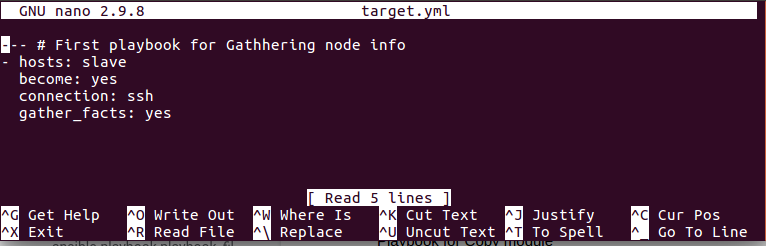
Example 13 Playbook for Gathering facts
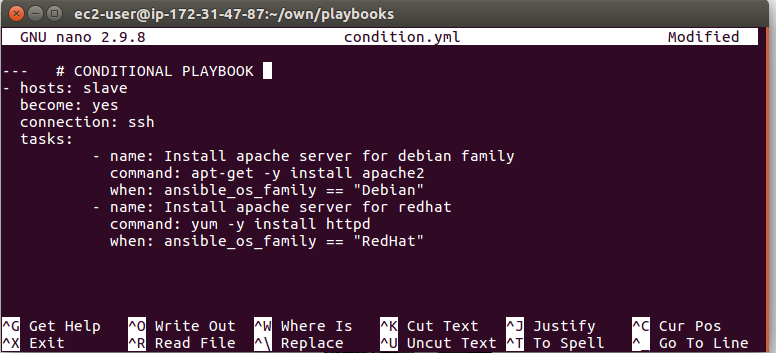
Example 14 Conditional Playbook
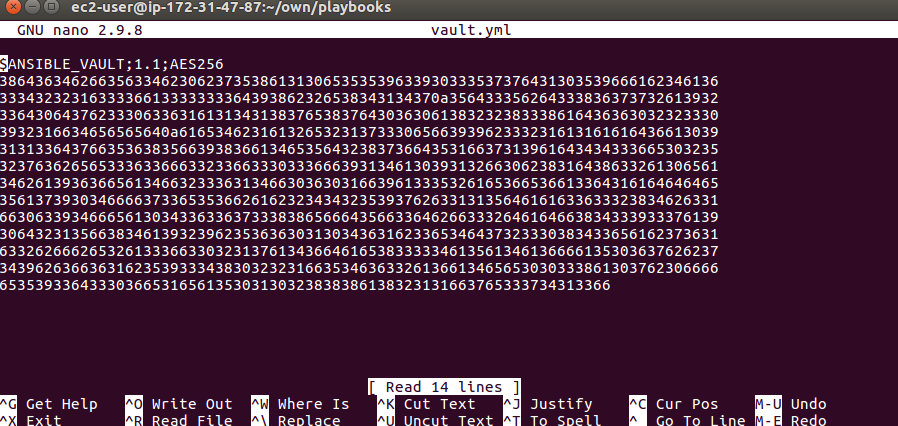
Ansible-Vault
Ansible Vault is a feature that permits you to maintain all of your secret safe and you can encrypt the secret files. Ansible Vault is fundamentally valuable when you need to store classified information. To encrypt your secret documents in ansible we utilize a utility called ansible-vault.
Creating New Encrypted Files
$ ansible-vault create vault.yml

-> open the file $nano vault.yaml you will get content of file in the encrypted form
Encrypt the Existing file
The ansible-vault encrypt command can be used to encrypt existing files. You’ll be prompted for your vault password twice. That’s all; we can now encrypt existing files in this manner.
$ ansible-vault encrypt abc.yaml
Display(view) the content of encrypted files
$ ansible-vault view abc.yml
Editing Encrypted Files
$ ansible-vault edit abc.yml
Decrypt the Encrypted Files
$ ansible-vault decrypt abc.yml
Changing the Password of Encrypted Files
$ ansible-vault rekey abc.yml
Ansible Roles
Roles give a structure for collections of variables, tasks, files, templates, and modules that are totally independent, or interdependent.
The role is the primary mechanism for splitting a playbook into multiple files in Ansible. This makes it easy for writing complex playbooks, and it makes them reusable
Let’ s see how to implement roles in ansible
Step 1 : First of all install the tree package in your system, tree cmd shows the hierarchy of the directories.
$ sudo yum install tree -y
And after that run simply $ tree . Now create the directories for Roles implementations. We have to create the playbook inside it roles inside it webserver and inside it tasks
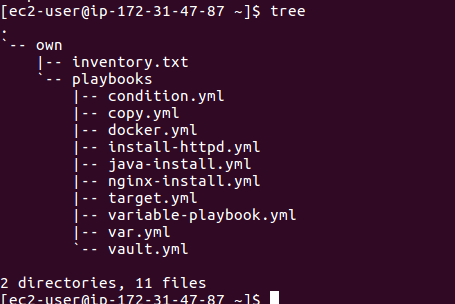
Just run one cmd directories will be created in one hit
$ mkdir -p playbook/roles/webserver/tasks
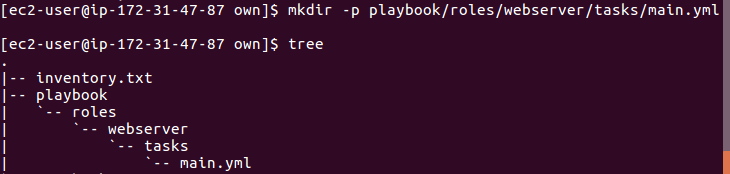
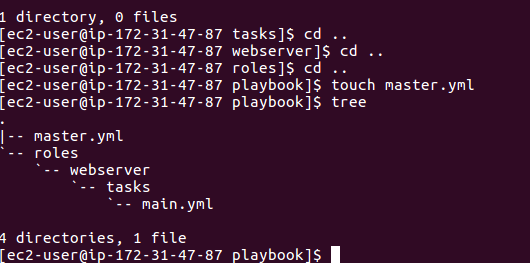
And inside tasks create one main.yml file and check hierarchy
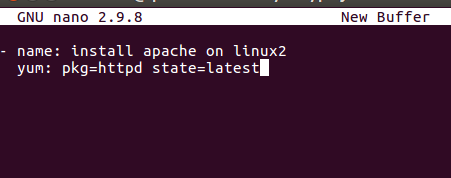
Inside main.yml write the tasks (here in my case i am writing the httpd installation) and save it
-> create one master.yml inside playbook directory with roles directory .
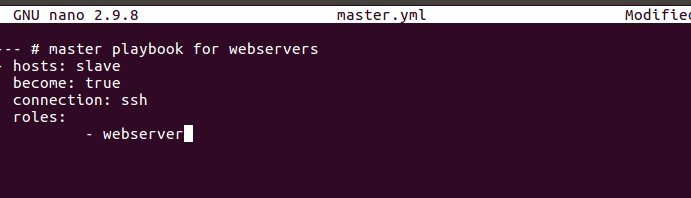
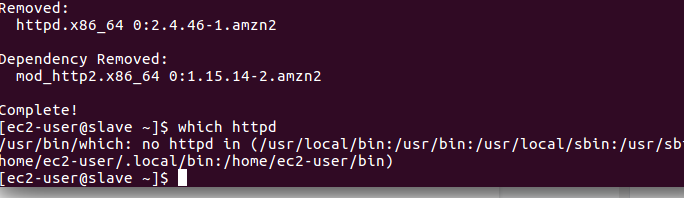
-> we already have httpd in our slave server so let remove from there
-> Now run the master by hitting the cmd
$ ansible-playbook master.yml -i /home/ec2/own/inventory.txt

-> it time to check the httpd on the slave server whether it got installed or not.

-> Voila